
How to Prep Math with Confidence - So It’s REALLY Open-and-Go

After a convo with a friend who told me she was frustrated with all the prep that Math with Confidence required each day, I realized that what I had done before we started the year had truly made it stress-free for me. (Ok, honestly - as stress-free as possible for teaching my own kids math.) There are occasionally items I have to grab the day-of. But about 90% of the time I can literally open the book and go…
Appreciation: I’d also like to give a shout-out to Katie from Life in the Mundane for the inspiration for my math kit. It has been a HUGE lifesaver.
I ended up using a binder as well as the “math kit” box. However, as you can see in the video above, Katie attached a plastic folder to her box to keep the paper printable (black line masters) in. I think it’s brilliant! And I ended up incorporating that into mine year two - to keep a few extra long items in.
Want more info about Math with Confidence? Check out my review here.
Now for the details…
Heads up: This post contains affiliate links. That just means, if you use one of my links to a product, I may earn a commission on that purchase, but it won’t cost you any extra money. If you choose to use my links, THANK YOU a million!! Read more.
Read the Instructor's Guide
Kate Snow (the author) has written these books directly to US - the parents. At the beginning of the book, she gives some really helpful information about how the book is set up as well as suggestions for how to prepare to teach it.
Then, throughout the units and chapters, she explains WHY she is teaching a certain skill at a certain time, what that skill prepares our children to do, and/or why it is important.
She also includes suggestions for how to know your child is ready to move on, or what to do if they are not ready for the next chapter. I always try to take a few minutes to read through the information before we start a new section.
Set up the Math Kit

First, I purchased a photo box keeper like this one. (I bought mine from Michael’s in person, but this looks like the same thing on Amazon. Just price check to find the best deal!!) I bought it from Michaels.com. They also have a clear/white one. It seems to go on sale a lot.
Each of the small boxes within the kit are roughly 6.75 x 4.5 inches. I labeled each one I used and filled them with the specified supplies from the Math with Confidence teacher’s guides (for grades K and 2). Many of the supplies overlap, and with the two grades I still have several empty boxes that I can use as we expand into other grades or add my third kid.
Then, I labeled each box on the top and side so I could easily spot what box to grab during lessons.
What I Included in the Boxes:
Remember what I put in these boxes were specific to kindergarten and Second grade. HOWEVER - the following year I was able to just double-check the new grade levels and pretty much used the same thing.
So, use this as a jumping off point for your math kit based on the grade level(s) you are using. I tried to include links for you to see either exactly what I have or something very similar.
Dice
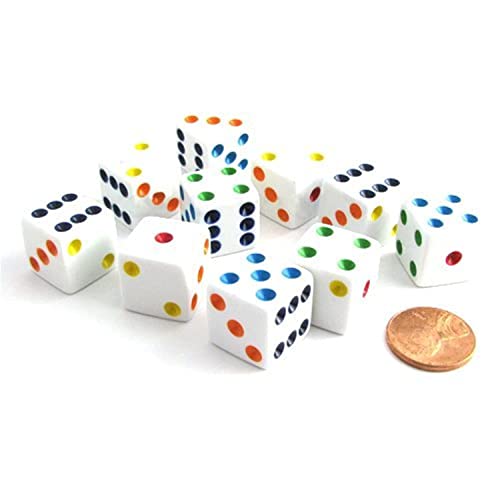
I keep quite a few in here that I can’t even tell you where they came from. I’d recommend having at least 2 or 3. Here’s a fun set with multi-colored dots.
Small Toys
These are used for specific activities within the curriculum, and I preferred to grab these ahead rather than day-of. They’re not used enough that it is necessary, but we have sooooo many random toys lying around…And with two kids this year I have used these toys a few times total. So, up to you but worth the prep to me!
What did I put in here? Miniature figures like Paw Patrol characters they don’t play with regulary and knights and any other random tiny toy I could find - about 6-7 of them.

She says to use two sets. You will need these! I have two different colored sets like these.
I really like having two colors because it’s so much easier to put them back in their correct boxes!
Coins
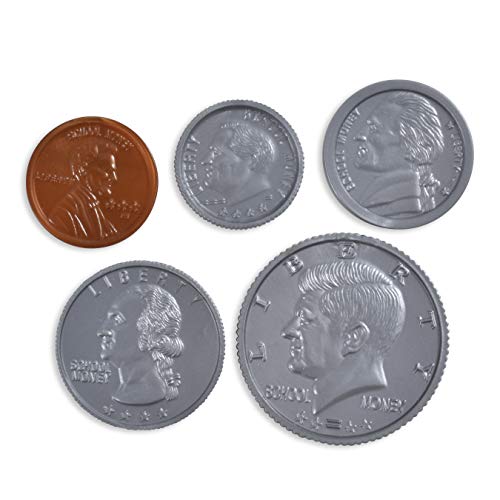
You can use fake ones, but I just grabbed a bunch of pocket change we had in a jar. It’s fun for the kids to get to play with real money, and then I know they are actually learning the REAL thing.
But if you’d rather, you can grab a set like this. Through 3rd grade I believe MWC uses up to 20 of each: pennies, nickels, dimes, quarters.
Wet-Erase Markers (aka Vis-a-Vis)
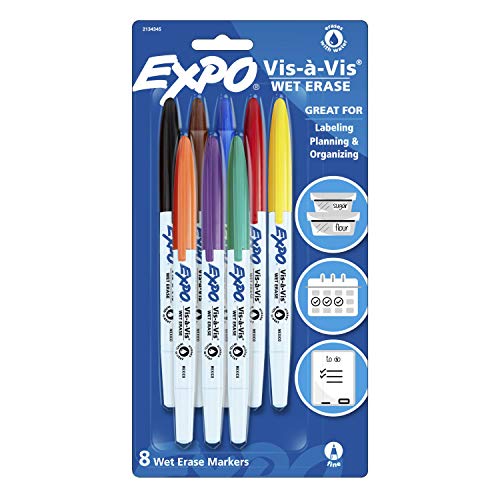
These are not included in Kate Snow’s lists, but I have found them helpful for several of the activities where a dry-erase marker will wipe off too easily. For example, while using the number line there is a lot of pointing and counting. The dry erase markers will wipe off with touching, so I find it easier to use the wet erase in that instance.

I LOOOOVE these things! And so do my kids. We use them for everything that calls for counters unless it specifically MUST be two-sided (granted, usually we just use two different colors). These just fit better on the 10-frames that are included with the curriculum.
The only problem I’ve had with these counters is occasionally you are asked to use them to cover up a number (like on the 100 chart) and they are still visible through these because they are “clear.”
This set is the same size and are available in opaque. If I were going to buy them over again, I would just get the opaque set. (But, just to be “clear” - no pun intended - I haven’t used this brand before.)
If you’re looking for the right size - just search for 0.75 inch counters.

Honestly: I would skip these and just use the clear (or small opaque) counters. But…
You might enjoy these if you really want to be able to flip them over. However, these are larger and don’t fit in the 10-frame Blackline Masters as well as the smaller ones above.
You can get magnetic or not - magnetic work better if you want to use a whiteboard or even a baking sheet. They won’t move around as easily. And, to circumvent the problems with these fitting on the 10-frames provided in the curriculum, I just enlarged the copies of the 10-frames with my copying machine so they’d fit.
Again, after the first year of using MWC with K and 2nd I think I gave mine away.

If you already own play money it should work - just confirm you have the correct denominations. The Instructor’s Guide includes the Materials List toward the back, or you can find the lists included in the sample Instructors’ Guides for each grade here.
You can always use the BLM money she includes in the back of the instructor’s guide.
I made a set that includes the denominations 1-100 as well as the 1000 that is required in MWC 3rd grade.
If you use another set of pre-made money, make sure you have something to use as a 1k bill when needed. (I have never in my life seen a $1000 bill, so I’m guessing this is more for the purpose of teaching place value, etc.)

I particularly love the ones that have felt-tip erasers on the caps like the ones I linked. They are thinner lined than the traditional whiteboard markers, and they have the semi-attached eraser!!
I have kept a few of them in my math kit, but will probably move them out as I need space for working with more kids. You can always mix some dry erase and wet erase markers in one box. Just make sure your kids know the difference!!
Set up the Binder

I used a 1.5 inch 3-ring binder like this one and have plenty of room for K and 2nd grade stuff together. I also think I’ll have plenty of room for one more grade once my youngest starts MWC K.
Label the Binder
I created a cover to go on my binder. I’d love to send you a free copy - just fill in the form below!
For the spine insert, I just used a piece of cardstock, cut it to size, and wrote “Math with Confidence BLM’s” on it. (If you just want to write it on the plastic cover, I think you can get it off down the road with rubbing alcohol.)

Download the Instructor Guide Sample

Rather than copying all of the “blackline masters” (BLMs) from the back of the teacher’s guide, go to welltrainedmind.com/mwc and download the SAMPLE instructors guide for your chosen grade(s).
The BLMs are included in the sample. So, you can print them straight from your computer. This will create cleaner copies than if you copy from your book and it’s faster than copying one page at a time.
Divide by Grade

If you are teaching more than one grade level, use tabbed binder dividers to separate the BLMs for each grade. (I love the write-on ones because they’re reusable and sturdy.)
Don’t go buy anything special for this- use a few that you already have! I mention these in case you’re looking for some reusable dividers.
Extra Type-A Weirdness: Game Prep
ALSO - If you prefer to have everything in ONE place and ready to go…you could take the time to copy ALL of the games from the book (student book) and put each one in a clear plastic sleeve. There should be a list of all the games for the level included somewhere in the teacher’s guide. Check that list for page numbers. This lets you prep them ahead of time so they’re ready for future use.
You certainly don’t have to do this. I did it the first year of using MWC and then didn’t for the current year I’m in. HOWEVER, I am finding that some of the games included in 3rd grade MWC are hard to play unless you make a copy. When they require counters but the page won’t lay flat b/c it’s in the middle of the book, it doesn’t work well. So, in this case I end up making a copy anyway! Maybe I should have saved myself the time by just copying all of these ahead of time…food for thought.
Or -you can always just put the empty sleeves in your binder and add the games as you go - as the curriculum suggests. Just know that your kid’s written work for that lesson will be on the back of the game. OR make a color copy and stick it in the sleeve!
If you really want to have these games available for playing aside from curriculum…You could take the time to write or copy the instructions from the teacher’s guide onto the back of each of the games. Some of the game boards have 2-3 versions for that game board. So, be sure to write down the alternate game instructions.
This way, if you want to use the games and don’t have the instructors guide handy or want to be able to grab and go you’ll have the instructions with you. Again, this was really me just being “extra.” If you don’t plan to use the games outside of the curriculum don’t worry about this.
Lists to Include in the Binder
These lists are found in the back of the instructor’s guide. You don’t NEED to copy and include them, but if you want them accessible or want to highlight etc. as you go through them you might like to have copies in the binder.
Complete Memory Work List (not in K)
Scope and Sequence - I copy and use this as I’m prepping for the year
Complete Picture Book List
Materials List - I use this to mark up as I gather supplies ahead of the school year
Game List and Extra Game Boards (not in K)
Other Items (to keep nearby)
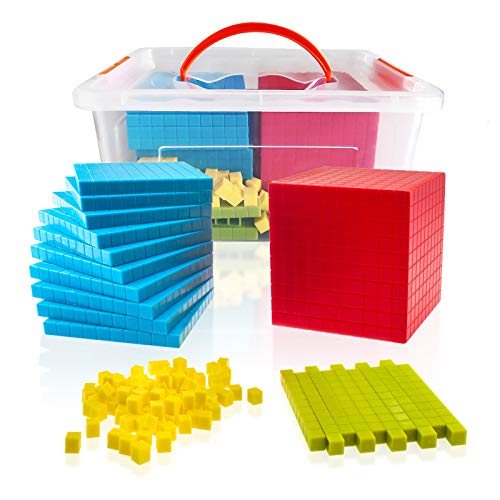
A friend gave me her old classroom set of base ten blocks - and I was so grateful to have them when we reached 2nd grade and started using them.
We’ve used them so far in 2nd and 3rd grade MWC. This set is similar to what I have. Mine came in a cardboard box - but I like having a box to keep them in.

I have two of these - one for me to demo and one for my “student” to use. But, you could definitely just buy one to share.
In 2nd grade Kate Snow has the instructor cover up the minute numbers on the clock to force the kids to count/memorize the time.
Copy Paper
Use the “cheap” 24 lb paper for letting the kids draw or for scratch paper, etc.
I’m a paper snob…my preferred weight is 32 lb If you are going to print double-sided and don’t like being able to see the print show through from the opposite side, invest in the nicer paper. I use this (32 lb) for printing my lesson planner.

Ticonderoga is “the” brand! Apparently they are supposed to hold up better than others. I can’t really say I’ve researched it deeply…I just heard that from someone I trust and have continued buying them ever since.
Index Cards
Seriously we use them for MWC a lot. You could easily fit 3x5 cards in one of the boxes! I have a variety of sizes - sometimes the tiny ones are actually helpful and they’re just more fun.
I’ve even used the larger size index cards in lieu of “boxes” that were called for in the 3rd grade level - they worked just fine along with the counters to play store for the lesson’s game. (You could probably even just use the regular 3x5 ones too.)

These blocks are NOT required for this curriculum, but we used them a lot with the previous math curriculum (Dimensions) and they are such fun math manipulatives - or even building toys - that I figured I’d mention we still have these as well.
They can be used as “counters” or as an alternate way to show 10-frames.
Where to Buy It All
TheWellTrainedMind.com - This is the publishing company’s website. (Go here for the samples of the instructor’s guide.) You can purchase directly from them as well.
Christianbook.com - They run sales all the time! Sign up for their texts to get frequent free shipping codes on purchases $35+. (I ordered some of my MWC curriculum from here.)
Amazon.com - I haven’t purchased this curriculum from here, but they sell it. Always price-check Amazon against these other sites to get the best deal. I have found better prices at Christianbook.com & Rainbow Resource but you have to factor in shipping costs or look for a coupon code.
Rainbowresource.com - I think they often have the best prices. And they provide FREE shipping on orders over $50 all year long from what I can tell. I have ordered some of my MWC curriculum from here.
Conclusion
I hope that this break-down is helpful for you!! I always search online for ideas for organizing and setting up curriculum before I get started.
If you have any questions, please feel free to reach out to me at emily@teachertutormom.com. I would be honored to try to help answers your questions or point you in the right direction!
Further Reading
Math with Confidence Review
Kindergarten Math with Confidence Review
First Grade Math with Confidence Review
Second Grade Math with Confidence Review
Third Grade Math with Confidence Review
Fourth Grade Math with Confidence Review